Facebook is the most popular social media platform, and with over 800 million users, it should be an important marketing tool for your business. Think about it this way: your clients are on Facebook and you should be too!
I have divided the set up process in 5 easy steps and in a matter of minutes you will be able to get your first “likes” on your very own Facebook Page.
Note that as of February 29, 2012, your Facebook Page will automatically have the new timeline layout that will be rolled out to everyone on March 30, 2012.
If you already have a Facebook page but have not installed yet the new timeline design, jump straight to step 2 and learn how to make the necessary changes to your account in order to optimize your marketing efforts on Facebook.
Step 1 – Create your Facebook Page
First of all, you will need to be logged in to be able to create a new page. Note that you will become the administrator of the page but you can choose to remain anonymous and add more administrators at a later stage.
So to get started, visit http://www.facebook.com/pages/create.php. You will be able to follow the step by step set up of your page.
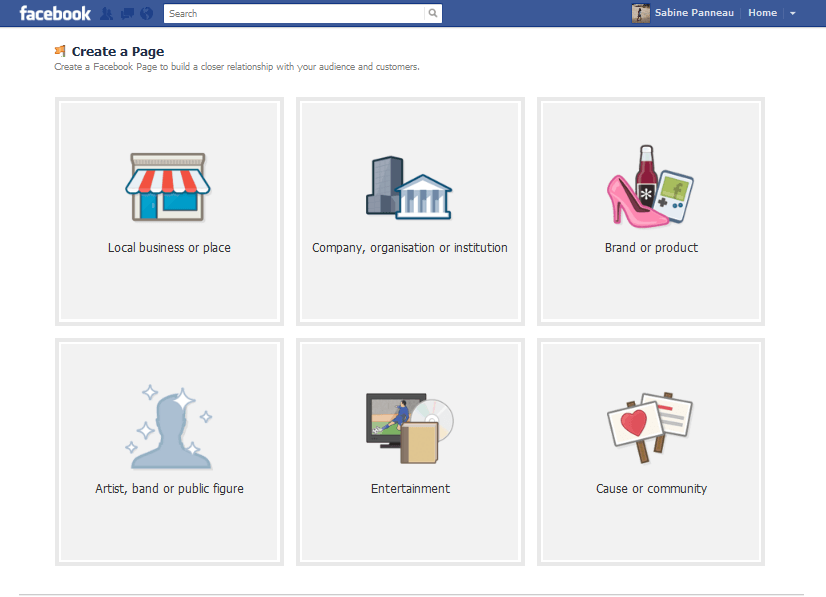
You’ll first be asked to choose one of these categories:
Local Business of Place (if you choose this option, you’ll have the opportunity to add the full address of your business)
Company, Organization or Institution
Brand or Product
Artist, Band or Public Figure
Entertainment
Cause or Community
You will also need to choose the corresponding sub-category and the name of your business and confirm the creation of your page.
Then follow the set up wizard and upload a photo or your logo if you have one, inform your contacts of the creation of this new page and finally enter the basic information regarding your business such as the website address and its main purpose. You’ll have more opportunities later to complete this in more details.
Step 2 – Complete your Facebook Page
I have divided this stage into 3 parts as shown on the image below:
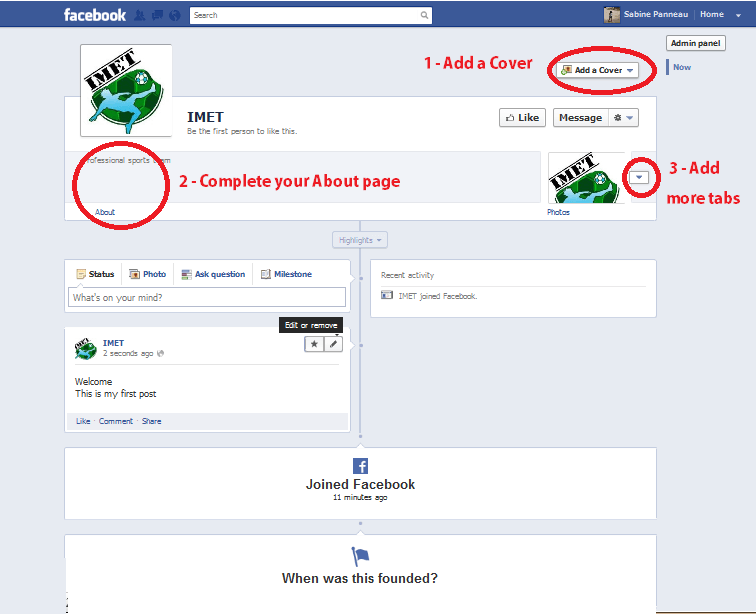
1 – Add a Cover – The Cover photo is a great new feature of your Facebook page as it will be displayed to everyone visiting your page (whether they clicked the like button or not) so this is your chance to get creative and present your business in its best light.
The dimensions of the cover photos are 851 pixels x 315 pixels (or 22.5 cm x 8.3 cm).
Please keep in mind that Facebook has set some rules regarding what you can and cannot do with this photo.
2 – Complete your About page – To access the About page, click on the Admin panel button on the top right hand side > Manage > Edit page > Basic information (from the menu on the left).
You may fill in all the information but the 3 fields below are the most important ones
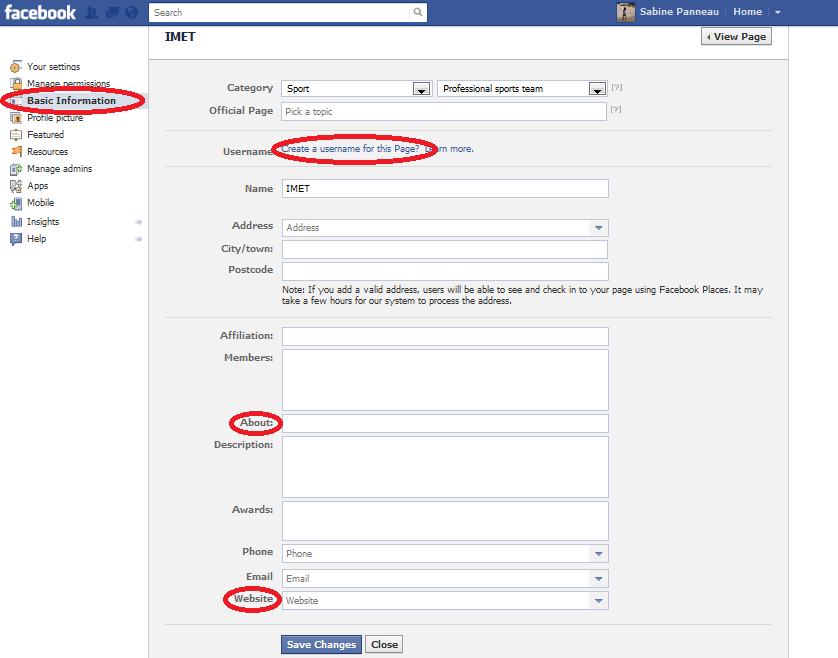
The username will create your Vanity URL. For instance my vanity URL is www.facebook.com/SabinePanneau. Depending on the name of your business you may wish to keep it the same or to change slightly. Note that once you have decided on your username, you will not be able to change it.
I would advise you to add your website or blog url at the beginning of the About description as well as the website box.
3 – Add more tabs – The tabs also called apps are a great way to get people to visit your You Tube account if you have already made videos or to see your Twitter, Google+ or Pinterest. Click here for a list of Facebook apps. I would also recommend you to add a welcome tab. Once you have your new apps, you may want to change the name each app and the icon to make it more appealing to your visitor and invite them to click on them. To change the name and a new image, just click on the small arrow next to the apps to preview all the apps, then click on the pencil by the side of the image and then edit the settings.
Step 3 – Add content to your Facebook page
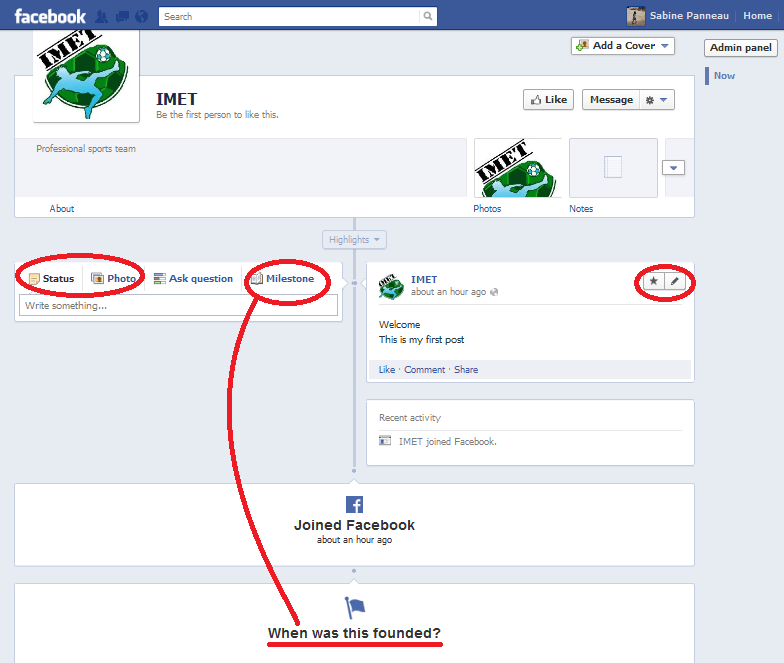
Just like on your personal Facebook account, you will want to post regular content to keep your followers informed. You will want post your new blog posts, your new videos or new photos. The secret of a successful Facebook page is to add great content and to interact with your audience.
Post can be pinned to the top by clicking on the small pencil on the right of the post (as shown on the image above) and they will remain 7 days on top of all the other posts (only one post at a time can be pinned to the top). You can also choose to highlight a post, by clicking the small star and the post will be the full width of the Facebook timeline, this is particularly good for all your posts with photos or videos.
Finally you can change the date of your posts and add past milestones to the timeline such the creation of your business or any other facts relating to your business that could be of interest to your visitors.
As ever, if you have any specific question, do get in touch or leave me a message on my Facebook page and I will do my best to help you. Don’t forget to like my page while you there! 😉
![]()
—————————————————————————–
 Sabine Panneau
Skype: sabp23
Email: sabine@sabinefep.com
Work with Me – Marketing Team
Tired Of Waiting For The Right Job Opportunity Abroad? I’ll show you how to make the most of your time overseas and create your own dream job anywhere in the world using an easy to follow routine that requires your own blog, the willingness to turn your passion into a business and a location independent attitude!
Click here to learn more!

